|
|
Post by admin on Dec 14, 2006 17:32:24 GMT -5
With no major projects for me to work on this year (aside from this little Seatrooper business I scratched on at another board), this year I'd like to focus on upgrading all my suits. Even my first one, my Biker Scout. Although many claim I'm the first person to complete a GM, I only claim I've just put my foot in the door. I did what I could to make the suit, and I did what I could to make it the highest quality I knew how. However, there is MUCH to be worked on. I basically want to start upgrading literally everything on the suit, aside from the minor things like the gloves, glove armor, undershirt, etc. But the thing that's my concern for the time being is the shoulder pads. Mine, even my second generation ones that I cast in fiberglass are, well, wrong. At least according to the recently released image of Hasbro's totally wicked awesome Galactic Marine figure. And Hasbro is more often right than they are wrong. So consider this my official Gen 3 shoulder pad research and development thread. I don't have the money or materials to start working on them at the time being, but I can certainly start sketching things out and working out concepts. For "reference," below is the photo of the Hasbro GM figure, sans helmet. Keep in mind when using this image as reference: Certain parts (like pauldrons and kama) are often times cast thicker than they should be to help make the parts hold up better to wear and tear. So we should take the figure as a reference with a grain of salt. I'll be using the movie stills as my main reference, but the basic design will come from what we're shown from the figure. Of course, a figure in-hand will certainly help out even more. OH GOD it's so HAWT! Calming self down. Calm. Callmmmm... Hello, Neo. 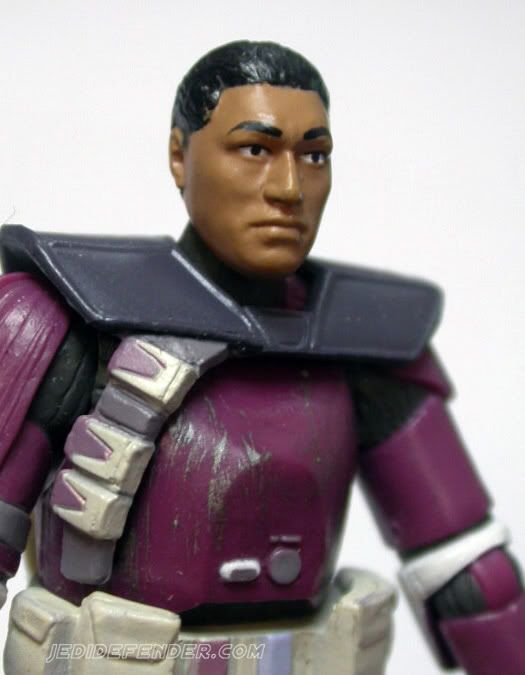 |
|
|
|
Post by admin on Dec 14, 2006 17:38:34 GMT -5
Here are my initial thoughts:
I was thinking that a good portion of it, if not all of it, could be made out of rigid leather. However, the only guy I know of that can produce something that is the quality I seek has produced work that I, well, don't like. His stuff tends to be too large, even when given exact measurements. He's a really, really large-framed guy, so he tends to make things according to his body type, so his stuff comes out large. And for this project, we cannot make it too large, or it will look funny.
So I've been contemplating how it should be done. My current ideas suggest that it should be made out of many different materials. Perhaps some hard plastic panels that incorporate some soft goods to hold them together. The center piece, however, should definitely have some flexibility to it, so I'm considering that some doubled/tripled up elastic should act as the center piece.
Some questions to consider: My gen 1 and gen 2 pauldrons were not flexible. They were constructed in a specific shape, and did not allow any conformity to the shape of your shoulders. So should the intersecting places between front, top, and back panels be left as soft goods? So they flop down into place? Or should they be kept as hard, rigid angles? I'm leaning for soft goods, but it'd have to be both loose AND extremely tough material. Perhaps black canvas as the hinge points. I dunno.
|
|
|
|
Post by pghfett on Dec 14, 2006 17:47:21 GMT -5
I know it a shot in the dark Dave, but have you looked at how football or hockey shoulder pads attach and "ride" on a persons body? Is this an option to consider?
|
|
|
|
Post by admin on Dec 14, 2006 17:52:15 GMT -5
I play hockey, and though I'm a goaltender, I'm thoroughly familiar with player shoulder pads. It certainly is something to consider, but I'm going to stay away from football pads. They are far too thick for our use. We need something with a low profile that sits very close to the shoulders.
I'm not considering using hockey shoulder pads, but rather I'm considering looking into how they're constructed, and the materials used in them. They are essentially plastic plates, wrapped in thin foam, and then sealed up in a breathable mesh fabric, and then rivetted together. However, for our needs, we'll need the plastic panels on the outside, or at least just below the surface materials.
OOOoooo the ideas are a-flowin'....
|
|
|
|
Post by pghfett on Dec 14, 2006 18:11:17 GMT -5
heres a pic of some Lacrosse shoulder pads !?! ;  Ideas a flowin' |
|
|
|
Post by youngling on Jan 12, 2007 23:27:04 GMT -5
WEll I dont have any progress pics yet but here is what I do have I am using my gen 2 pauldrons I designes after Captain Ferin's and I am going to extend them with some extra plastic so They almost meet in the middle. Then for the middle section I will most likely use some sort of elastic or canvas.
BTW Captain I would gladly work with you on this project just tell me how I can help in any way and I will give my Ideas. Hey also guys If I can I would make fiberglass or resin versions of these to sell to anyone who is interested but that is quite a ways off.
|
|
|
|
Post by admin on Jan 12, 2007 23:42:30 GMT -5
You know, Fiberglass versions are still a very good option. That would certainly make the panel sections MUCH easier to work with. That way you can have hard panel sections with all the detail, but then still allow for a canvas hinge point between the panels. My biggest concern, though, is for seamless integration between parts on the outer side of the mantle. So I'm going to pursue this is as a soft-goods project and keep the FG option for a last resort.
(BTW, I'm now calling it a mantle because it more resembles one.)
|
|
|
|
Post by pghfett on Jan 13, 2007 0:42:26 GMT -5
Dave,
We can "break down" the FG pauldrons then apply the material as needed. Basically cut the pauldrons on all the seam lines and then apply fabric to them making each joint independant of one another. I'm going to try this when I get yours and have considered using contact cement for the pleather / cloth attachment. I've been giving this some thought as of late.
|
|
|
|
Post by Anrev on Jan 13, 2007 1:02:22 GMT -5
FG can get a little heavy IMHO. Especially as thick as those would be. And truth be told, leather might too. We'll just have to see.
|
|
|
|
Post by admin on Jan 13, 2007 1:15:39 GMT -5
For all my contact cement needs, I use Shoe Goo from Wal-mart. It has the best hold for any soft goods in my experience. I use this to secure velcro to the knees of jumpsuits. Put on a moderate amount, smoosh in the cloth, and let it sit overnight. The hold is unbelievable. WHen I screwed up my first GM boot, I literally had to carve it off... I could not peel it off.
I agree. My original idea for this version 3 is to have primary construction using sintra or plexiglass, black vinyl, and black duck cloth. All of these matierials are fairly light and pretty flexible. One good point for the FG, though, is that the weight of it will not allow the mantle to ride up. It should allow it to sit properly from the get-go, without having to adjust anything. But like you said, we'll just have to see.
|
|
Deleted
Deleted Member
Posts: 0
|
Post by Deleted on Jan 15, 2007 22:52:55 GMT -5
I am wondering something here...When you guys say "shoulder pads" (i.e. this whole research topic) are you talking about the RED plastic shoulder pads (where the right one has those little grooves) or are you talking about the BLACK shoulder pads/pauldron?
|
|
|
|
Post by admin on Jan 15, 2007 23:02:17 GMT -5
The general term for the red plastic part is "shoulder bell," and this term permeates all Imperial armored costumes. The term "pauldron" has been applied to what the Sandtroopers, ARC Troopers, and Clone Commanders wear, though the one that the Clone Commanders wear have a greater mantle area than the actual pauldron. Anyways, when we say "shoulder pads" (or what I am now referring to as a "mantle"), we mean the black part. I originally called them "shoulder pads" because they are of equal size and do not really extend out beyond the shoulder like the pauldrons typically do. They sit on top, much like a football player's shoulder pads do, hence the terminology. I also called them shoulder pads because I thought they were separate pieces, much like the shoulder pads in a woman's business coat. I'm now calling it a "mantle" because, as Hasbro has graciously shown us, it is a single piece that connects in the center. It appears to wrap around the neck, or "mantle area," hence my new terminology. I'm sorry for the confusion though! I can see where you're coming from since it's an easy thing to get confused about. You can pretty much understand that we're talking about the black thing if we don't say "shoulder bell."  |
|
Deleted
Deleted Member
Posts: 0
|
Post by Deleted on Jan 15, 2007 23:16:36 GMT -5
The general term for the red plastic part is "shoulder bell," and this term permeates all Imperial armored costumes. The term "pauldron" has been applied to what the Sandtroopers, ARC Troopers, and Clone Commanders wear, though the one that the Clone Commanders wear have a greater mantle area than the actual pauldron. Anyways, when we say "shoulder pads" (or what I am now referring to as a "mantle"), we mean the black part. That's fine wiht me...Mantle it is...Thanks for the clear up... I don't know which one I like better though...I liked your original design because if you moved your shoulders, they would move with it, but I kind of like the Hasbro version for the very same reason... I will say this though, if you check this reference site (which i'm sure most everyone knows about) www.jediokc.com/clone%20website/main.htmand if you go down to the main six options, go to ROTS Ref down all the way at the bottom they have the GM screen shots...I think you are correct in saying that Hasbro is more often right than not...If you look really closely at ANY of those screen shots, it doesn't matter which way the troopers are standing or if they have been shot by Ki-Adi-Mundi and are falling, the shoulder pads/mantle pieces that you can see don't EVER change position (i.e. more like the hasbro version with the center piece keeping it steady)... One thing I also noticed about those mantles from the screen shots is that (I am assuming that they ARE one piece just not shown in the movie) they ARE NOT straight across...There is a slight angle downward...VERY slight...They do not look like they are completely parallel with each other, they look like they could be sloping a couple of degrees...Of course, if the edges (what you actually see) are heavies than the center piece (which I'm sure they would be) they would slope a LITTLE bit no matter what position they are in... One other thing is that, I have been working with leather for over a year and while I am not a master leather worker, I think for this design, to do one with leather would be a great idea, BUT I have a small suggestion...To get a stiff (shape holding) leather, it WILL have to be thick, and I mean THICK...For that shape to hold for that design would have to be AT LEAST 9-10 oz. leather...Keep in mind that I am saying LEATHER ONLY! What I would suggest is that if you are going to do this in leather (which is my personal favorite choice of materials here) I would suggest getting thin leather (1-2 oz. or 3-4 oz.) and reinforcing it with something small UNDERNEATH similiar to C.F.'s original design...That would LOOK good, FUNCTION properly and would NOT be too big...Just my $.02 |
|
|
|
Post by admin on Jan 15, 2007 23:25:52 GMT -5
You're right. There is a slight downward angle, and this is something I've been keen to from the beginning. But you have to take the Hasbro figure into consideration. The figure isn't meant to be an exact replica of the GM (nor is any figure), rather it's meant to be a scaled representation of the actual GM. So we're not actually using the figure as exact reference. We're more using it as a guideline for basic structure and design, and then turning to the screen caps and other official references (Sith Snapshots) for the details. Good eye though.
The leather thing would definitely look good, no matter how you do it. Basically it comes down to how complex you want the build to be, or how much work you're willing to do.
I think after one of us builds our mantle, we should offer up a sort of generalized tutorial and pattern sheet for others to use. The patterns and tutorial would be flexible enough to allow for various materials and construction styles, but would result in generally-consistant end products.
|
|
Deleted
Deleted Member
Posts: 0
|
Post by Deleted on Jan 15, 2007 23:50:21 GMT -5
I would be willing to be that guinea pig...I actually have a HUGE chunk of leather in my room right now that would work...I would prefer thinner than I have, but for a prototype, it would be fine...
I am going to say this though...For anybody who feels that leather working is not in their skill range or who don't feel like doing it, I will say this: to gain/practice basic leather skills, all you need is a third grade art education...It is VERY simple...Not to (figuratively) crap on the people like that guy who does that SUPER nice pauldron that's too big, but there are a few simple techniques that I have learned that I use to do everything simple:
CUTTING (use a knife, not scissors (much easier), a utility knife will do),
WATERFORMING (wet the leather, shape it by hand and make sure that while it dries overnight it does not bend back to it's original sheet-like shape)
and STITCHING...Stiching honestly takes a little time, not a lot, but enough...
I think I might try to do this piece in leather this weekend...Here's what I'm planning to do with it:
1) Cut the shape (like the Hasbro single piece)
2) Waterform it (the curves) and let dry
3) Reinforce it with polystyrene or cardboard or something semi-stiff
4) Cover it with something black (vinyl or cloth or something like that) (the only thing I am not sure about for this step is how to attach/sew/stitch the cover material to the leather/shape holder (backing))
Any thoughts?
|
|