|
|
Post by youngling on Oct 14, 2006 11:26:40 GMT -5
.
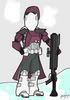
That said, you may wish to make a simplistic sintra shoulder pauldron for trooping with the Z-6. Sintra is forgiving in the sense that it takes a lot to crack it, AND it's easy a cake to work with. Just cut it to shape (I actually have a template), heat it up along your bend points with a heat gun, and bend it, run it under cold water, and there you go. Just paint it black and your set. Then have a nice shoulder pauldron on the left since the one on the right will be pretty much hidden. You'll want to go buy a black yoga mat or something like that you can cut up and glue to the top of the shoulder pauldron though, that way you'll have something the gun can grip to so it won't slide off.
In addition to that, you may wish to actually pad the inside of that pauldron with some thicker foam (1") just to help protect the armor underneath.[/quote]
Can you post that template i would like a better idea of what i am working with. Of course we will have to cut it up to serve our needs but it would be nice to see what i am working with.
|
|
|
|
Post by admin on Oct 14, 2006 11:58:10 GMT -5
|
|
|
|
Post by admin on Dec 13, 2007 0:40:30 GMT -5
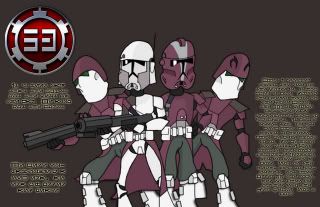
Pinned this thread because it is a Battlefront II Expanded Universe weapon for Galactic Marines.
|
|
|
|
Post by Toyhunter80's on Dec 13, 2007 19:41:18 GMT -5
|
|
|
|
Post by apollo on Dec 13, 2007 20:19:53 GMT -5
That's the one. I think the consensus is that they're all the same gun but stylized differently.
Btw, that trooper is an ARC heavy gunner and he has a GM chest and GM boots!
|
|
|
|
Post by precentorjames on Dec 13, 2007 21:26:04 GMT -5
I was hoping someone was going to say that. Good to know I am not hallucinating all the time.
|
|
Deleted
Deleted Member
Posts: 0
|
Post by Deleted on Dec 14, 2007 0:32:23 GMT -5
The only thing that sucks about the first two pics is that, that figure (and I have that figure to prove it) does not have the GM chest, it has the standard TC chest and ab-plates.
|
|
|
|
Post by Toyhunter80's on Dec 14, 2007 16:58:01 GMT -5
The only thing that sucks about the first two pics is that, that figure (and I have that figure to prove it) does not have the GM chest, it has the standard TC chest and ab-plates. I have it too and was thinking the same thing. |
|
|
|
Post by irricanian on Dec 14, 2007 20:43:07 GMT -5
|
|
Deleted
Deleted Member
Posts: 0
|
Post by Deleted on Dec 14, 2007 22:08:17 GMT -5
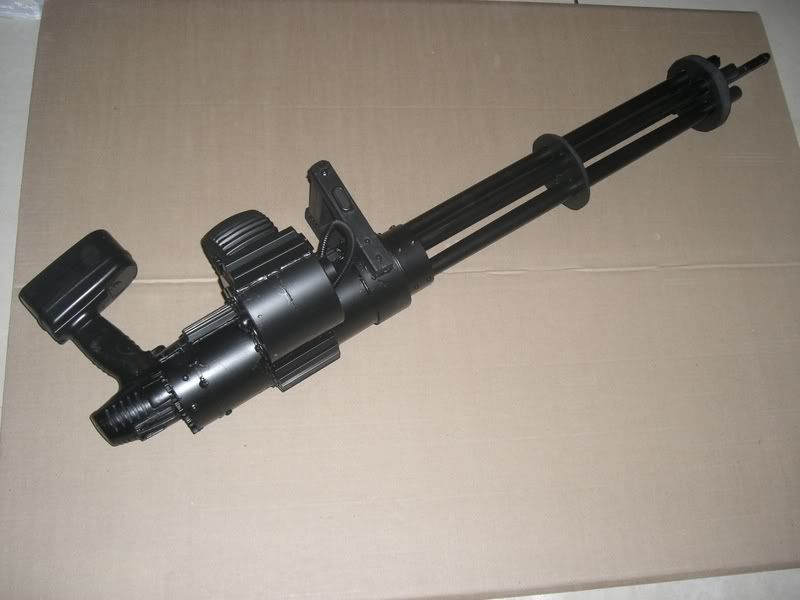
Dude that is KILLER! That it actually rotates too is just awesome. Very creative (I bet you didn't have to mod the drill either - bonus)
|
|
|
|
Post by apollo on Dec 15, 2007 10:39:06 GMT -5
KILLER would be a very appropriate term. Too cool
|
|
|
|
Post by Toyhunter80's on Dec 15, 2007 15:55:01 GMT -5
Requsting instructions on how to build one. That is if you want to share. That is the best thing I have ever seen. When I first saw the pic and read that it actually sun, I was like "where's the video!" then I clicked on the think and was taken to the promised land! Great job. |
|
|
|
Post by irricanian on Dec 15, 2007 19:53:28 GMT -5
Well it's very simple really. I'll try to explain... Here's the materials list: an $18 14volt cordless drill, (power source) 1- 3 foot piece of 3/8" threaded rod (center rotating shaft) Brass bushing or nut with threads drilled out to fit on the 3/8 rod 4- 1/2" nuts 1- 1/2" Acorn nut 1- foot of 4" PVC sewer pipe (main body) 1- 4" PVC end cap (main body cap) 3- 3" PVC end caps ( ammo pod and barrel retainer) 5- 3 foot lengths of 1/2" PVC pipe (barrels) 1- 2 foot pice of 3/4" square dowel (for handle) 1- 1' x 1' piece of 3/4" MDF or plywood (to cut circles for barrel attachment) 1- 1' x 1' piece of 1/2" MDF or plywood (to cut circles for barrel attachment) Some misc greeblies, mostly I used old tap n die cases. The accordion looking bit is a plastic cover from the back of an old office chair  Hot glue gun, some screws to put it together and black Krylon fusion paint and voila! To assemble basically the 3/8 threaded rod is inserted into the drill chuck and tightened so it wont come out(ever!) then put the drill thru the 4" PVC pipe and knotched the pipe to fit around the drill handle, used some blocking and set some screws in to hold it in place. Drilled a hole in the 4" PVC cap to fit the bushing I made, slide it on the rod and glue the cap down. Now make the barrel from the 5 lengths of 1/2" PVC. Cut circles out of the 1/2 and 3/4 wood and drill 5 eaqually spaced holes to slide the barrels thru and a 3/8" hole for the rod in the center, the 3" PVC cap goes on the end and the 5 barrels go into it, held with screws. A 3/8 hole is also drilled in the center. the whole barrel assembly goes onto the shaft with a nut on either side of each wood circle to keep it in place. Cut the rod end to length with a hack saw and install the acorn nut. The other two 3" PVC caps are glued together to make the ammo pod, then I put the greeblies on to look like a railguns spool (chairback thing) Made the handle from the 3/4" dowels. Paint and weather to taste. Whew! Thats about it. The drill packs can be re-charged and swapped out when needed. I was also going to put some kind of light source inside the main body and a flapper to make noise against the drill chuck( kindof like the hockey card in the bike spokes idea) but I ended up selling it to one of my garrison mates when I moved. Hope this helps. |
|
|
|
Post by precentorjames on Dec 15, 2007 23:22:00 GMT -5
Wow.
Thats perhaps the coolest thing....ever.
|
|
|
|
Post by Krazy Ivan on Nov 13, 2008 21:05:54 GMT -5
|
|